
도커 레지스트리 만들기
읽기 전에
아래의 조건을 만족한다고 가정하고 진행합니다.
- 유닉스 계열 운영체제다.
- 도커가 설치되어 있다.
- docker-compose도 설치되어 있다.
- 도메인의 소유자다.
- 서버로 nginx를 사용한다.
도커 레지스트리, 왜 필요한가
도커의 강점 중 하나는 다른 사람이 만들어놓은 이미지를 도커 허브에서 언제든지 받을 수 있다는 점입니다. 그런데 도커 허브는 퍼블릭 저장소는 제한 없이 제공하지만 프라이빗은 그렇지 않습니다. 만약 회사에서 사용하는 이미지를 서버에 저장하고 싶을때 어떻게 해야 할까요?
- 이미지 자체를 백업한다.
- 클라우드에 레지스트리를 만든다.
- 온 프레미스에 레지스트리를 만든다.
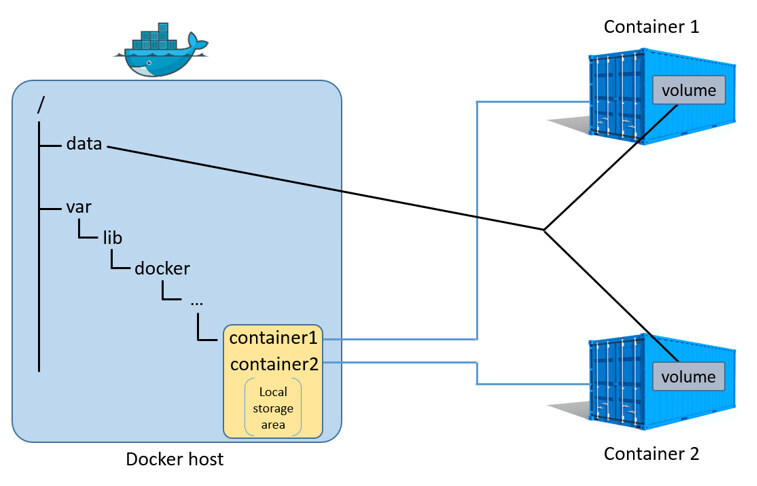
첫번째 경우를 살펴보죠. ‘도커도 어딘가에는 이미지를 파일 시스템에 저장할테니 그걸 백업하는게 어떨까?’라는 무식한 방법이 있습니다. 보통 도커는 리눅스 기준 /var/lib/docker/에 데이터를 저장합니다.
아래 명령으로 컨테이너 레이어를 직접 볼수도 있습니다.
$ sudo ls /var/lib/docker/containers
1a174fc216cccf18ec7d4fe14e008e30130b11ede0f0f94a87982e310cf2e765
1e7264576d78a3134fbaf7829bc24b1d96017cf2bc046b7cd8b08b5775c33d0c
38fa94212a419a082e6a6b87a8e2ec4a44dd327d7069b85892a707e3fc818544
c36785c423ec7e0422b2af7364a7ba4da6146cbba7981a0951fcc3fa0430c409
dcad7101795e4206e637d9358a818e5c32e13b349e62b00bf05cd5a4343ea513
그러므로 /var/lib/docker/를 통째로 백업하여 두고두고 개인 저장소로 만들어도 됩니다. 하지만 이러면 관리뿐만 아니라 사용하기도 불편합니다. 흠, 더 나은 방법은 없을까? 아래와 같은 방법은 좀 나을까요?
docker save my_image > my_image.tar
역시 좋은 생각이 아닙니다. 아무래도 도커 허브와 같은 레지스트리가 필요할 듯 합니다. 제일 간단한 방법은 클라우드 서비스를 이용하는 겁니다. 아마존의 경우 Elastic Container Registry를 제공합니다. 흔히 ECR이라고 하죠. 여러분이 AWS를 사용하고 있다면 이는 아주 좋은 선택일 것입니다. Elastic Container Service와 연동하기 매우 용이하기 때문이죠.
하지만 어떠한 이유로 개인 서버에만 이미지를 저장하고 싶을 수 있습니다. 이럴땐 직접 도커 레지스트리를 만들면 됩니다! 심지어 레지스트리 이미지도 있습니다! 그러면 이미지를 받고 실행만 하면 끝날까요?
Let’s get Let’s Encrypt SSL Certificates
불행히도 도커 레지스트리는 HTTPS만 지원합니다. HTTP도 가능하나 설정 과정이 귀찮습니다. 보안도 신경쓰고 인터넷에서 접속이 가능케 하려면 역시 인증서를 받는게 좋습니다. SSL 인증서를 발급 받으려면 보통 돈을 내야 합니다. 하지만 우리에겐 무료로 인증서를 발급해주는 Let’s Encrypt가 있습니다. 그리고 이 과정조차 매우 간단하게 해주는 certbot도 있죠! 다음 명령어로 certbot-auto를 받읍시다.
$ wget https://dl.eff.org/certbot-auto
--2019-08-21 17:22:02--  https://dl.eff.org/certbot-auto
Resolving dl.eff.org (dl.eff.org)... 151.101.0.201, 151.101.64.201, 151.101.128.201, ...
Connecting to dl.eff.org (dl.eff.org)|151.101.0.201|:443... connected.
HTTP request sent, awaiting response... 200 OK
Length: 68689 (67K) [application/octet-stream]
Saving to: 'certbot-auto'

certbot-auto      100%[==================================>]  67.08K   259KB/s    in 0.3s

2019-08-21 17:22:03 (259 KB/s) - 'certbot-auto' saved [68689/68689]
어? 데비안 계열의 apt나 맥의 brew 같은 패키지 매니저로도 받을수 있지 않나요? 다른건 몰라도 저는 apt를 굉장히 싫어합니다. 서버가 오래되고 관리하다 보면 언젠가 터지는 종속성 문제 때문입니다. 해결도 쉽지 않죠.
어쨌든 certbot-auto를 받았으면 다음의 명령으로 실행권한을 주고, 명령어로 등록합시다.
chmod +x certbot-auto
sudo mv certbot-auto /usr/local/bin/certbot-auto
이제 certbot-auto를 사용할 수 있습니다. 다음 명령에서 registry.example.com은 자신의 도메인을, email@example.com은 자신의 이메일로 바꾸어 실행합니다.
$ certbot-auto certonly --standalone -d registry.example.com \
--preferred-challenges http \
--agree-tos -n -m email@example.com \
--keep-until-expiring

Saving debug log to /var/log/letsencrypt/letsencrypt.log
Plugins selected: Authenticator standalone, Installer None
Obtaining a new certificate
Performing the following challenges:
http-01 challenge for registry.example.com
Waiting for verification...
Cleaning up challenges

IMPORTANT NOTES:
 - Congratulations! Your certificate and chain have been saved at:
   /etc/letsencrypt/live/registry.example.com/fullchain.pem
   Your key file has been saved at:
   /etc/letsencrypt/live/registry.example.com/privkey.pem
   Your cert will expire on 2019-11-19. To obtain a new or tweaked
   version of this certificate in the future, simply run certbot-auto
   again. To non-interactively renew *all* of your certificates, run
   "certbot-auto renew"

 - If you like Certbot, please consider supporting our work by:
   Donating to ISRG / Let's Encrypt:   https://letsencrypt.org/donate
   Donating to EFF:                    https://eff.org/donate-le
이게 전부입니다. /etc/letsencrypt/live/에 방금 발급 받은 뜨끈한 인증서가 있습니다.
인증서 발급 트러블슈팅
인증서 발급 실패의 경우 대개 아래와 같은 문제가 대다수입니다. 만약 정상적으로 발급 받았다면 그냥 넘어가시면 됩니다.
이미 사용중인 포트 사용
에러 메세지 중에 아래의 내용이 있다면 현재 80번 포트를 다른 프로그램에서 사용하고 있어 Let’s Encrypt에서 도메인을 확인하지 못한다는 뜻입니다.
Problem binding to port 80: Could not bind to IPv4 or IPv6.
주로 nginx, apache 등 내부 서버를 사용하는 경우 발생하므로 잠시 껐다가 인증서를 발급 받고 다시 켜시면 됩니다.
서브도메인 미등록
CNAME 또는 A레코드를 등록하지 않아서 생기는 문제입니다.
Challenge failed for domain registry.example.com
IMPORTANT NOTES:
- The following errors were reported by the server:
Domain: registry.example.com
Type: connection
Detail: dns :: DNS problem: NXDOMAIN looking up A for
registry.example.com
To fix these errors, please make sure that your domain name was
entered correctly and the DNS A/AAAA record(s) for that domain
contain(s) the right IP address. Additionally, please check that
your computer has a publicly routable IP address and that no
firewalls are preventing the server from communicating with the
client. If you're using the webroot plugin, you should also verify
that you are serving files from the webroot path you provided.
당연히 자신의 도메인에 A레코드나 CNAME을 등록하면 해결됩니다.
SSL 적용하기
이제 발급 받은 인증서를 nginx에 적용합시다. registry.example.com라는 파일을 만듭니다. 여러분은 자신이 만든 도메인을 파일 이름으로 사용하시면 됩니다.
vi /etc/nginx/sites-enabled/registry.example.com
아래와 같이 기본적인 내용을 작성합니다.
# registry.example.com setting
server {
  # http -> https redirect setting
  listen 80;
  server_name registry.example.com;
  server_tokens off; ## Don't show the nginx version number, a security best practice

  return 301 https://$host$request_uri;

  access_log  /var/log/nginx/registry_access.log access;
  error_log   /var/log/nginx/registry_error.log;
}

server {
  listen 443 ssl http2;
  listen [::]:443 ssl http2;

  server_name registry.example.com;

  # Certificate and key files location
  ssl_certificate            /etc/letsencrypt/live/registry.example.com/fullchain.pem;
  ssl_certificate_key        /etc/letsencrypt/live/registry.example.com/privkey.pem;

  client_max_body_size       2048M; # Change this to the max file size you want to allow

  location / {
    proxy_set_header  Host              $http_host;   # required for docker client's sake
    proxy_set_header  X-Real-IP         $remote_addr; # pass on real client's IP
    proxy_set_header  X-Forwarded-For   $proxy_add_x_forwarded_for;
    proxy_set_header  X-Forwarded-Proto $scheme;
    proxy_read_timeout                  900;

    proxy_pass        http://localhost:5000;
  }
}
반드시 위와 같을 필요는 없습니다. 상황에 맞게 설정을 하는게 가장 좋습니다. 단, 주의하실 점은 proxy_pass의 값을 아래에서 등록할 레지스트리의 주소를 입력해야 합니다. 위 값은 같은 머신에서 도커 레지스트리의 기본 포트 값을 적용했을 경우입니다.
드디어 레지스트리 만들기
이제 도커 레지스트리를 만듭시다. 저는 서비스를 하나만 추가하더라도 별도의 docker-compose.yml을 만들어 관리하는 걸 선호합니다.
mkdir -p registry/auth && cd registry
vi docker-compose.yml
auth 디렉토리는 나중에 접근을 제어하기 위해 필요합니다. 일단 아래의 내용을 작성합니다.
registry:
  restart: always
  image: registry:2
  container_name: registry
  ports:
    - 5000:5000
  environment:
    REGISTRY_AUTH: htpasswd
    REGISTRY_AUTH_HTPASSWD_PATH: /auth/htpasswd
    REGISTRY_AUTH_HTPASSWD_REALM: Registry Realm
  volumes:
    - ./auth:/auth
나중에 레지스트리 접근 제어를 위해 htpasswd를 사용합니다. 작성을 끝냈으면 이제 빌드합니다.
docker-compose up -d
축하합니다! 이제 여러분만의 도커 레지스트리가 생겼습니다. 서비스가 제대로 올라갔는지 확인해 봅시다.
$ docker-compose ps
Name Command State Ports
--------------------------------------------------------------------------
registry /entrypoint.sh /etc/docker ... Up 0.0.0.0:5000->5000/tcp
$ curl https://registry.example.com/v2/_catalog
{"errors":[{"code":"UNAUTHORIZED","message":"authentication required","detail":[{"Type":"registry","Class":"","Name":"catalog","Action":"*"}]}]}
접근제어를 위해 인증 옵션을 주었기 때문에 위와 같이 출력되면 정상적으로 서비스가 올라간 겁니다.
레지스트리 접근 제어하기
앞서 묻지도 따지지도 않고 레지스트리에 권한을 요구하도록 했습니다. 사설 레지스트리인데 아무나 접근하면 안되기 때문입니다. 그럴 경우는 없다고 생각하지만, 인증을 원치 않으면 docker-compose.yml을 다음과 같이 작성하면 됩니다.
registry:
  restart: always
  image: registry:2
  container_name: registry
  ports:
    - 5000:5000
우리는 인증을 사용할 것이기 때문에 이제 사용자를 추가해야 합니다.
$ docker run --rm --entrypoint htpasswd registry:2 -Bbn user1 1q2w3e4r >> auth/htpasswd
$ cat auth/htpasswd

user1:$2y$05$DjCZOMqHQ0yE1aV6ydFf2eMb3nn5J1DQCoeYG5cKHjXdXU4SmfjUy
user1과 1q2w3e4r은 원하는 아이디와 비밀번호를 입력하면 됩니다. 정상적으로 동작하는지 확인합시다.
$ docker login registry.example.com
Username: user1
Password:
WARNING! Your password will be stored unencrypted in /root/snap/docker/384/.docker/config.json.
Configure a credential helper to remove this warning. See
https://docs.docker.com/engine/reference/commandline/login/#credentials-store
Login Succeeded
진짜로 축하합니다! 드디어 레지스트리 설치와 작업이 끝났습니다!
레지스트리 사용하기
직접 설치했지만 도커 허브와 사용법이 다르지 않습니다.
푸쉬하기
푸쉬를 하기 위해 일단 alpine 이미지를 도커 허브에서 받습니다.
$ docker pull alpine
Using default tag: latest
latest: Pulling from library/alpine
9d48c3bd43c5: Pull complete
Digest: sha256:72c42ed48c3a2db31b7dafe17d275b634664a708d901ec9fd57b1529280f01fb
Status: Downloaded newer image for alpine:latest
docker.io/library/alpine:latest
여기서 주의해야 할 점이 있는데 푸쉬할 이미지의 이름을 바꾸어 줘야 합니다.
$ docker tag alpine registry.example.com/alipine
$ docker ps
REPOSITORY                       TAG                 IMAGE ID            CREATED             SIZE
alpine                           latest              961769676411        33 hours ago        5.58MB
registry.example.com/alipine     latest              961769676411        33 hours ago        5.58MB
위와 같이 반드시 도메인/이미지으로 변경해야 합니다. 도커 허브에서 개인저장소에 푸쉬 할 경우 아이디/이미지처럼 되는 것과 같은 이치입니다. 이제 로그인을 하고 푸쉬를 해봅시다!
$ docker login registry.example.com
Authenticating with existing credentials...
Login Succeeded

$ docker push registry.example.com/alipine
The push refers to repository [registry.example.com/alipine]
03901b4a2ea8: Pushed
latest: digest: sha256:acd3ca9941a85e8ed16515bfc5328e4e2f8c128caa72959a58a127b7801ee01f size: 528
성공했습니다!
풀 받기
이제 풀 테스트를 해봅시다.
# 현재 저장되어 있는 이미지를 삭제합니다.
$ docker rmi registry.example.com/alipine
Untagged: registry.example.com/alipine:latest
Untagged: registry.example.com/alipine@sha256:acd3ca9941a85e8ed16515bfc5328e4e2f8c128caa72959a58a127b7801ee01f
$ docker pull registry.example.com/alipine
Using default tag: latest
latest: Pulling from alipine
Digest: sha256:acd3ca9941a85e8ed16515bfc5328e4e2f8c128caa72959a58a127b7801ee01f
Status: Downloaded newer image for registry.example.com/alipine:latest
또 성공했습니다!

결론
도커 레지스트리를 설치하고 HTTPS까지 설정하여 언제 어디서나 레지스트리를 이용할 수 있게 되었습니다. 문서 초반에도 설명했지만 클라우드를 이용하고 있다면 해당 클라우드의 레지스트리 서비스를 이용하는게 가장 좋습니다.
만약 도커 레지스트리를 입맛에 맞게 설정하려면 레지스트리 설정을 확인하세요. htpasswd가 아닌 다른 인증 방식을 사용하고 싶으면 레지스트리 인증에서 원하는 인증방식을 선택하세요.
참고
- https://docs.docker.com/registry/deploying/
- https://docs.docker.com/registry/spec/api/
- https://computingforgeeks.com/how-to-setup-docker-private-registry-on-ubuntu-18-04-letsencrypt-ssl/
- https://gitlab.com/gitlab-org/gitlab-ce/blob/master/lib/support/nginx/registry-ssl